
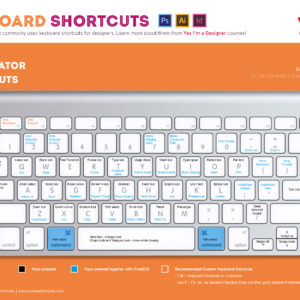
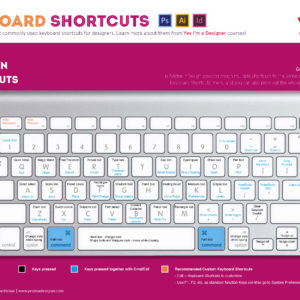
Keyboard Shortcuts can save you a lot of time no matter what type of work you are doing. They can help you to work much more efficiently and be more productive. Some tests showed that users working with shortcuts can work up to 5 times faster than users only using their mouse. I’m a huge fan of shortcuts, especially when it comes to work in Adobe applications. I decided to help everyone who is new to shortcuts and created the Ultimate Keyboard Shortcut Guide for Photoshop, Illustrator and InDesign. The guide is based on an Apple keyboard, but it can be used by PC users too (you just need to imagine that the Cmd modifier is the Ctrl).
Feel free to download these images or print out this PDF. You can also share this PDF anywhere as long as you provide a link to my website. Also feel free to message me if you think I left out a useful shortcut.
Have fun and good luck with memorising all these keyboard shortcuts.
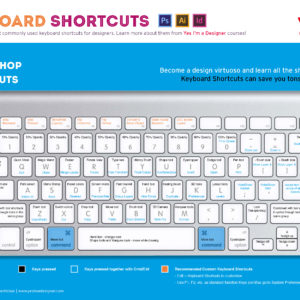

Here are some of the shortcuts from the Guide:
Select All – Cmd/Ctrl+A
Deselect – Cmd/Ctrl+D
Invert Selection – Cmd/Ctrl+Shift+I
Reselect – Cmd/Ctrl+Shift+D
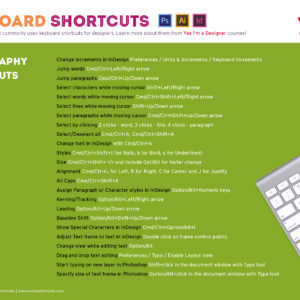
Modify Selections
– Shift+click to Add
– Option/Alt+click to Subtract
– Option/Alt+Shift+click to Intersect
– Shift+F6 to Feather
– Cmd/Ctrl+Option/Alt+R to Refine EdgeBlend modes
Change selected layer(s) blend mode:
– Option/Alt+Shift+
N – Normal
I – Dissolve
K – Darken
M – Multiply
B – Color Burn
A – Linear Burn
G – Lighten
S – Screen
D – Color Dodge
W – Linear Dodge
O – Overlay
F – Soft Light
H – Hard Light
V – Vivid Light
J – Linear Light
Z – Pin Light
L – Hard Mix
E – Difference
X – Exclusion
U – Hue
T – Saturation
C – Color
Y – Luminosity
View options
Enter Mask view
– Option/Alt+click on Layer mask
Bird’s Eye view
– Press and hold H
Scrubby zoom
– Press and hold Z and click and drag left and right
Selection based on Layer’s content
– Cmd/Ctrl+click on layer’s thumbnail
Select All Layers – Cmd/Ctrl+Option/Alt+A
Clipping Mask
– Option/Alt+click between two layers
Group Layers – Cmd/Ctrl+G
Ungroup Layers – Cmd/Ctrl+Shift+G
Open/Close All Top-most Layer Groups
– Cmd/Ctrl+click on a disclosure triangle
Open/Close a Top-most Layer Group including items in Nested Groups
– Alt/Option+click on the disclosure triangle to see all the content including items in Nested Groups
Open/Close All Top-most Layer Groups including items in Nested Groups
– Cmd/Ctrl+Option/Alt+click on a disclosure triangle to see all the content in the layer stack including items in all Nested Groups
Move Layer up/down in layer stack
– Cmd/Ctrl+[/]
Send Layer to front/back in layer stack
– Cmd/Ctrl+Shift+[/]
Select next layer – Option/Alt+[/]
Show only selected layer
– Option/Alt+click on layer’s eye icon
Create a New Layer
– Cmd/Ctrl+Shift+N
Merge All Layers onto a New Layer
– Cmd/Ctrl+Option/Alt+Shift+E
Change Opacity
for selected layer(s)
– 0-9 (tool selected has to be something without Opacity controls)
Change Fill Opacity
for selected layer(s)
– Shift+0-9 (tool selected has to be something without Fill controls)
Increase/Decrease Brush size
– Cmd/Ctrl+Option/Alt+click
and drag right/left
Increase/Decrease Brush hardness
– Cmd/Ctrl+Option/Alt+click
and drag up/down
Cycle through brush tips – </>
Drawing Squares and Perfect Circles
– Hold down Shift while drawing with the Shape tools or Marquee tools
Start drawing from the center
– Hold down Option/Alt while drawing with the Shape tools or Marquee tools
Drawing straight vertical/horizontal lines
– Hold down Shift while drawing
HUD color picker (Heads Up Display)
– Cmd/Ctrl+Option/Alt+Shift/Control+click and hold with the Brush tool
Eyedropper
– Hold down Option/Alt while drawing with the Brush tool
Fill with Foreground color
– Option/Alt+Backspace
Fill with Background color
– Cmd/Ctrl+Backspace
Fill dialog box
– Shift+Backspace
Change Opacity of drawing tool – 0-9
Change Flow of drawing tool
– Shift+0-9
Temporarily select tools
– Hold down the tool’s keyboard shortcut while using it and when you let it go Photoshop will automatically switch back to the previously used tool
